Wednesday, April 23, 2008

title!


Right, so there's the candle (thanks to Sean Whalley for taking it while I was having an interior panic about burning the place down).

So I'm renting a studio space at the university for the summer and thusly I will hopefully be posting on here during that time.

Here's my to do list:
That self portrait light box thing
more bed/bag things
"pouring things in stuff"
gargoyle(s)

Lots of things. Lots of fun!

Sunday, April 13, 2008

Catch Up!

This is how the candles started.

And this is the image that was put on the candles.


I used these websites:
numero uno
el deuce
trois

Monday, March 17, 2008

The Cement Backpack (there's a swear in this)

Alright so my great and wondrous goal of blogging every couple days or even once a week didn't happen but it was midterms and at this point, I'm happy I've made it out with my sanity. Thankfully, although I've been away from the blog, I've been writing things down and then taking pictures of them. Below are images of the thought process as well as the backpack in the snow and then my class around it chatting about it.


And just for fun, here's a comic from Married to the Sea about geochashing (the means by which the class got to the backpack). I've just linked to it because there's a swear or two.

Wednesday, February 27, 2008

So many things!

Tonight/this morning I am thinking about: Cindy Sherman
more environmentalism
hypocrisies
tourism
Nelson Mandela
performance/project vs. sculpture
and this picture,


On a different subject:
people touching my things.
anxiety attacks
sleeping on the couch
parts of the process

On a whole other subject:
making another thing with stuff
vans
cross-country travel
backpacks
cement
finding myself

Still one more:
finding a frame
taking a picture
making a crown

so many ideas. how many can happen in ART 350?

Sunday, February 24, 2008

How I made the blanket (so far)

Here's some process pictures! Hooray!


This probably best shows the process of putting the bags together. Two layers of bags (total of four layers of plastic) laid on each other and overlapped are put in between card stock. I then ironed them on the lowest setting possible. It was easier to manage working with six bags (three long, two thick) at a time then putting them together which is shown.


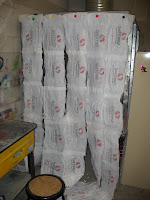
These are five of the long strips before they got sewn together. I had to put them up to be able to see where it was going.


This is me sewing bags!!!


My poor needle got so static-y that it was covered in dust. So sad.


This is the underside of the . . . top? Perhaps you can see I used just very simple straight stitches.


Here it is sewn together on three sides. Soon I will stuff and quilt it. It's a little thinner than I had originally planned but I'm happy with it.

This is the inside. I just thought it looked neat. In the picture though, it looks a lot cleaner and whiter than it really is.

Fair Trade

After an interesting series of events, I ended up trading a picture from my sketchbook for a key chain. I asked if I could take this young man's picture with the drawing. He said yes. Below that picture is one where you can see the key chain in action and my set up in the spray room.


Friday, February 22, 2008

Battle of the Bags Video

This CBC documentary online is about 40 minutes long and is a resource that I was directed to when I put out the call for bags. There are some rather graphic images but overall it is worth sitting down and watching. I've linked to the larger website as a whole rather than embed the video because there is more information there (and a quiz!) that's worth looking at.

This is in the last few moments of it:
"If I were a plastic bag, I would feel misunderstood, because people don't understand . . . all the attributes of my permanence." Thank you plastic representative!

-"creative type" using bags for art

Thursday, February 21, 2008

the bed in (out of) bags

I figure that since I worked on the thing for about seven hours today alone and have been plotting and planning it for about a month, I should probably start mentioning it on here.

So I'm making a bed in a bag set out of plastic bags. The assignment was "The Dollar Store" and I thought about convenience shopping as a whole. There's just so so much to cover in regards to both production and consumption and it was totally overwhelming. How the hell do I put all that into one piece? It all came out in plastic bags. And the phrase, "You made your bed, now lay in it," original, I know but it made sense.

It started with seeing this and thinking that there could be a bigger, better application. I looked into it more and found another tutorial and some quilting basics. I already knew what goes into a bed in a bag.

I put out a call on facebook for plastic bags and the response was awesome! I got so many bags! They showed up in my studio, on my doorstep, and when I picked them up! I have been taking several pictures of my pile as is grows and shrinks (or rather turns into fabric).

This project is ambitious to say the least. I haven't even gotten to how I'm presenting it yet.

I'm going to wait until it is finished or my camera is nearer to my computer to show more pictures of the whole process and finished product but here is a teaser of when I convinced my lovely assistant Neil to help me sort and fold bags. This isn't all of them, this way mid way through that evening's sorting. I've received more since this was taken and I had already done some sorting at that point.

By way of a process/number update I think right now I'm at 177 Safeway and 70 President's Choice bags that have had something done to them.


Thursday, February 14, 2008

blonde brunette redhead


And here are the three gnomes! Two are cast in cement, the other is the original clay.

With each of the cement versions, I had some problems with shifting and air bubbles. In the first one there was some shifting after I had poured the cement (I was trying to convince myself that I could actually pick up and move the whole kit and caboodle) so there are some larger seams and some bits a little off. In the second, I used a cement that had larger stones. When I poured it, although I was more conscious of air bubbles, it seems I am not yet very good at it. On a happy side though, the rocks and the air pockets created an amazing effect on the back of the head and the arms.

I was just so happy that the original actually came out in one piece I couldn't bear to actually get rid of it. Hopefully during the break it will be the one that I paint and fancy up a bit.


This is with the first bridges, before plaster. Not too long after this, the whole process got very very messy and the camera didn't come out again.

Friday, January 18, 2008

Gnome pre-casting


Here's some photos of my gnome before covering it in plaster.

Friday, January 11, 2008

First Post/Gnome research

Well, here it is. The Sketchblog.

This blog will supplement my physical sketchbook for ART 350. I'm doing this because a lot of my research naturally leans toward online avenues and rather than print it all off to shove into my smaller-than-standard-printer-paper sketchbook, I'm going to post links to images and web pages that inspire my work. In addition to this, I will be posting pictures of work as it progresses.

And here's the beginning of it.
For our first project, the assignment is to make our Ultimate Garden Gnome. In my searching for images of gnomes, I found this fabulous image filled website, Gnomeland. It's so well cataloged! I also found myself looking for pictures of girl gnomes (thinking of course that I might try to make a little Meghan) and was aghast at what is on the site.

Lingerie and old ladies!!! If anything, now I'm making a version of myself for certain. An Angry Meghan. After a discussion with Bryan, we're both going to be making our alter egos. I'm expecting me, cocked head and glasses, raised eyebrow and trying to be conscious of the fact that it will have to be made into a mold.

Hazaa!